Follow

How to edit default filter options

Default filter options

You can change the default import options for each filter used by Déjà Vu. Déjà Vu has a list of file extensions that it will recognize, and each of these extensions has a filter assigned to it and a set of options that will be used with that filter by default. This is what determines what filter is used by Déjà Vu automatically when you add a new document to a project, and the options that are used by default with that filter.

You can edit this list: you can add new file extensions so that Déjà Vu will recognize your documents automatically and use the right filter to import them, you can change the default filter being used for any pre-defined file extension and you can change the filter options for any pre-defined extension if you find that you often need to change the filter options when you import new documents.

Click on the version of Déjà Vu you are using, below:

Déjà Vu X2 Déjà Vu X3
   

To see the list of file extensions:

  1. Access the menu option Tools>Options.
  2. Select the Filters tab.

To add a new file extension

You can add a new file extension so that Déjà Vu X2 will automatically recognize a file format that you import often and automatically assign the correct filter and the correct filter options for importing it. You might want to use this if you are often given documents in an XML-based format and you want Déjà Vu X2 to automatically use the filter definition file you made for this format, and not have to select it every time. To do this:

  1. Type the name of the file's extension in the appropriate textbox:
  2. Select the import filter that you want Déjà Vu X2 to use with this file extension by clicking on the appropriate combo box:
  3. Click on the button labeled ... to edit the filter options for the filter you just selected:
  4. The Default Filter Options dialog will appear, allowing you to select the options you want Déjà Vu X2 to use with the new file type you are creating:
  5. Click on OK when you are done.
  6. The Add button will become available. Click on it to add the new file extensions to the list of file extensions Déjà Vu X2 recognizes.

Déjà Vu X2 will now recognize the file extension you have added and it will automatically use the filter you assigned to it with the options you chose.

To edit the options for an existing file extension

You can also edit the configuration of a file extension that already exists in the list. To do so:

  1. Select the file extension you wish to edit from the list.
  2. Select the import filter that you want Déjà Vu X2 to use with this file extension by clicking on the appropriate combo box:
  3. Click on the button labeled ... to edit the filter options for the filter you just selected:
  4. The Default Filter Options dialog will appear, allowing you to select the options you want Déjà Vu X2 to use with the new file type you are creating:
  5. Click OK when you are done.

The new settings you have entered will now take effect.

What filter and options to use

You can learn more about the filters available and the effect of each option by reading the appropriate sections of the Déjà Vu X2 manual.

To see the list of file extensions:

  1. Access the menu option File>Options.
  2. Select the Filters tab.

To add a new file extension

You can add a new file extension so that Déjà Vu X3 will automatically recognize a file format that you import often and automatically assign the correct filter and the correct filter options for importing it. You might want to use this, for example, if you are often given documents in an XML-based format and you want Déjà Vu X3 to automatically use the filter definition file you made for this format, and not have to select it every time. To do this:

  1. Type the name of the file's extension in the appropriate textbox:
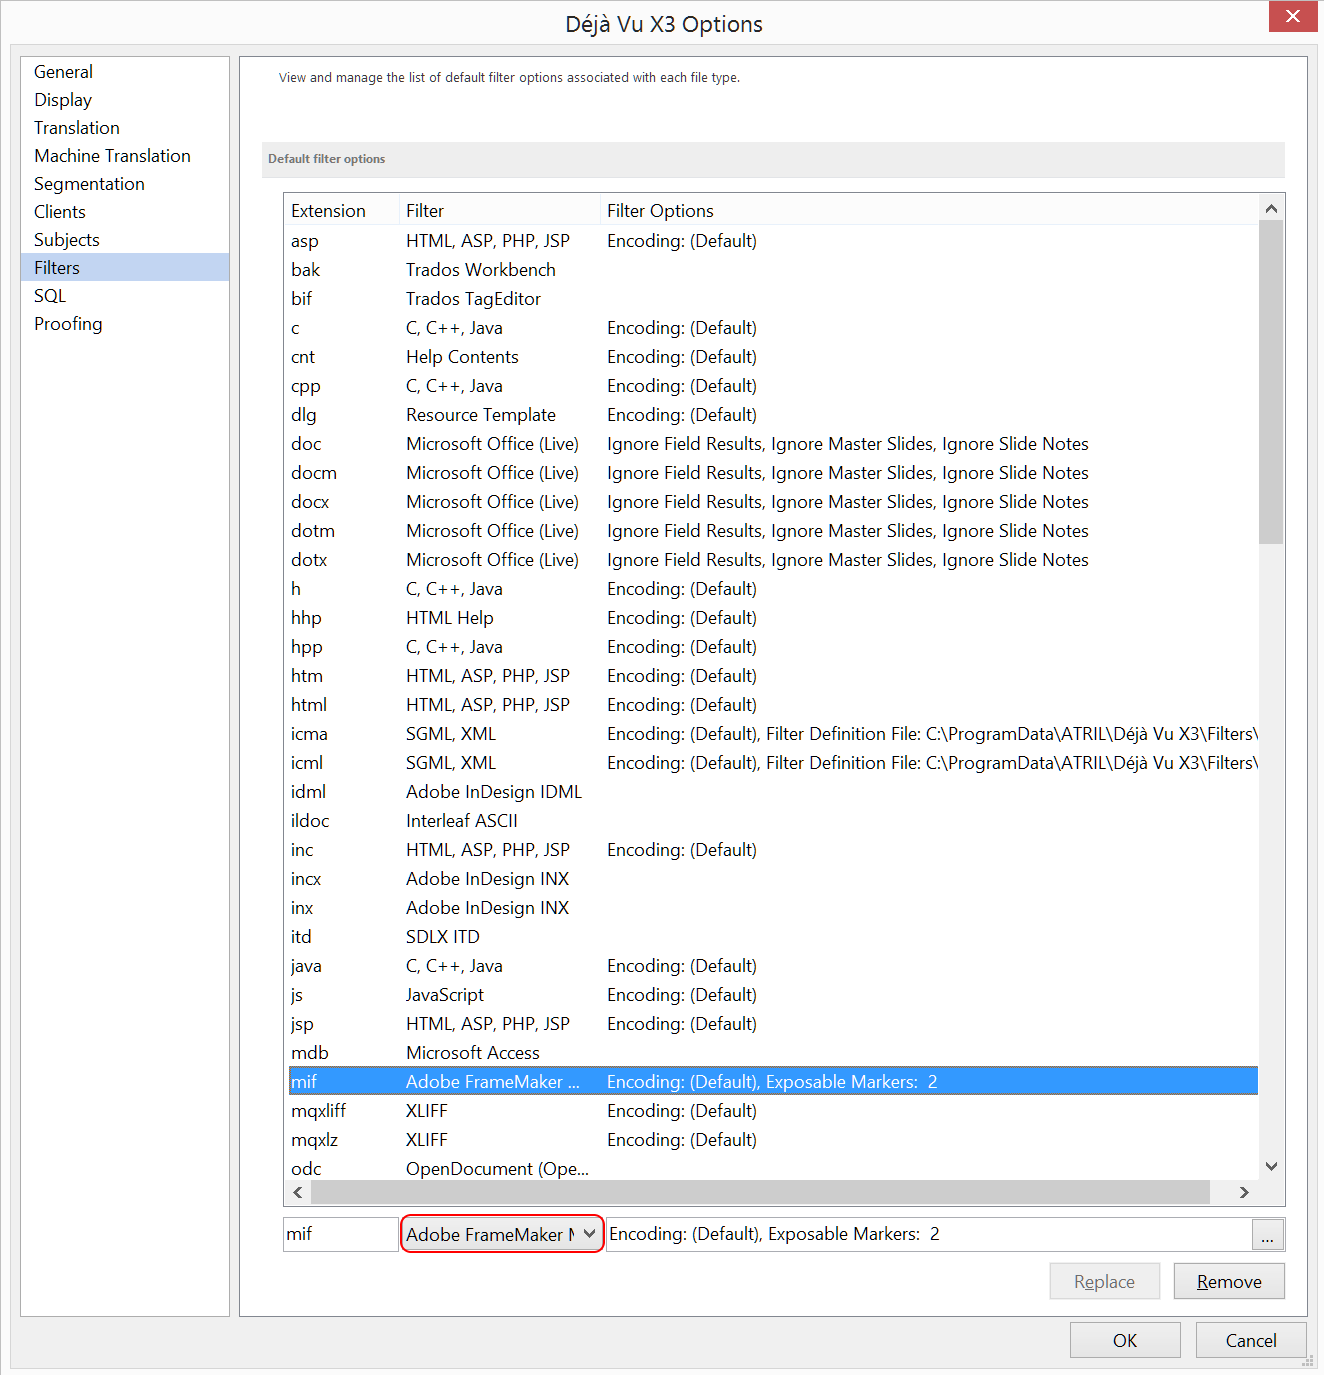
  2. Select the import filter that you want Déjà Vu X3 to use with this file extension by clicking on the appropriate combo box:
  3. Click on the button labeled ... to edit the filter options for the filter you just selected:
  4. The Default Filter Options dialog will appear, allowing you to select the options you want Déjà Vu X3 to use with the new file type you are creating:
  5. Click on OK when you are done.
  6. The Add button will become available. Click on it to add the new file extensions to the list of file extensions Déjà Vu X3 recognizes.

Déjà Vu X3 will now recognize the file extension you have added and it will automatically use the filter you assigned to it with the options you chose.

To edit the options for an existing file extension

You can also edit the configuration of a file extension that already exists in the list. To do so:

  1. Select the file extension you wish to edit from the list.
  2. Select the import filter that you want Déjà Vu X3 to use with this file extension by clicking on the appropriate combo box:
  3. Click on the button labeled ... to edit the filter options for the filter you just selected:
  4. The Default Filter Options dialog will appear, allowing you to select the options you want Déjà Vu X3 to use with the new file type you are creating:
  5. Click OK when you are done.
  6. Click Replace to replace the existing settings with the new ones you have configured:

The new settings you have entered will now take effect.

What filter and options to use

You can learn more about the filters available and the effect of each option by reading the appropriate sections of the Déjà Vu X3 manual.

Was this article helpful?
0 out of 0 found this helpful
Have more questions? Submit a request

Comments

Powered by Zendesk